<?xml version="1.0" encoding="utf-8"?><feed xmlns="http://www.w3.org/2005/Atom" ><generator uri="https://jekyllrb.com/" version="3.10.0">Jekyll</generator><link href="http://srombauts.eu/feed.xml" rel="self" type="application/atom+xml" /><link href="http://srombauts.eu/" rel="alternate" type="text/html" /><updated>2026-04-27T21:34:29+02:00</updated><id>http://srombauts.eu/feed.xml</id><title type="html">SRombauts.fr</title><subtitle>Comments from a Game/Tools dev ;)</subtitle><author><name>Sébastien Rombauts</name></author><entry><title type="html">Astrophotography: Mount and Telescope setup time-lapse</title><link href="http://srombauts.eu/2023/02/20/astrophotography-mount-and-telescope-setup-time-lapse/" rel="alternate" type="text/html" title="Astrophotography: Mount and Telescope setup time-lapse" /><published>2023-02-20T00:00:00+01:00</published><updated>2023-02-20T00:00:00+01:00</updated><id>http://srombauts.eu/2023/02/20/astrophotography-mount-and-telescope-setup-time-lapse</id><content type="html" xml:base="http://srombauts.eu/2023/02/20/astrophotography-mount-and-telescope-setup-time-lapse/"><![CDATA[<p>I was asked to show how I setup my mount and telescope, so I recorded me accelerated 30 times, and shared it on YouTube:</p>

<!-- Courtesy of embedresponsively.com //-->

<div class="responsive-video-container">
    <iframe src="https://www.youtube-nocookie.com/embed/XTB7xq6rVC4" frameborder="0" webkitallowfullscreen="" mozallowfullscreen="" allowfullscreen=""></iframe>
  </div>

<p>Time-lapse of the setup of my old CGEM Celestron mount and the TS APO 65/420 refractor telescope, with an ASI178MM black and white camera (planetary, but cooled by a DIY Peltier module for longer exposure deep-sky imaging).</p>

<p>Taken on 2023-02-20 near Paris.</p>

<h2 id="part-1---25min-from-1842">Part 1 - 25min from 18:42</h2>

<p>Initial assembly and positioning of the mount, the scope, the heaters, the cameras, and all their cable.</p>

<p>Short break: I stopped the recording after approximately 25 minutes, while I had to wait for the night to fall, for the Polaris north star to appear in the sky.</p>

<h2 id="part-2---30-min-from-1926">Part 2 - 30 min from 19:26</h2>

<p>When Polaris (the north star) appears in the sky, it’s time to align the equatorial mount with the Earth’s axis of rotation.
After that, I point the mount successively to Venus &amp; Jupiter planets, a star I forgot, then Capella giant &amp; Betelgeuse supergiant stars, to calibrate precisely its orientation.</p>

<p>After that, I am ready to start my imaging sessions (from inside the house): tonight it’s the Monkey Head nebula (NGC 2174) in H-alpha (Hα, with a wavelength of 656, in the red).</p>

<h2 id="footnotes">Footnotes</h2>

<p>I’ll try to retake this in 4K and without the midle break. I should be able to get a better quality overrall.</p>

<p>TODO: I should also post a retrospective on how I built the little DIY Peltier module, and link it here.</p>]]></content><author><name>Sébastien Rombauts</name></author><category term="astrophotography" /><category term="video" /><summary type="html"><![CDATA[I was asked to show how I setup my mount and telescope, so I recorded me accelerated 30 times, and shared it on YouTube:]]></summary></entry><entry><title type="html">Power Shell cheat sheet</title><link href="http://srombauts.eu/2022/12/08/power-shell-cheat-sheet/" rel="alternate" type="text/html" title="Power Shell cheat sheet" /><published>2022-12-08T00:00:00+01:00</published><updated>2022-12-08T00:00:00+01:00</updated><id>http://srombauts.eu/2022/12/08/power-shell-cheat-sheet</id><content type="html" xml:base="http://srombauts.eu/2022/12/08/power-shell-cheat-sheet/"><![CDATA[<p>I figured that I should keep track of some useful command-line tools that I am learning, so I’ll write down them as blog posts and keep updating them.</p>

<h2 id="benchmarking-net-7">Benchmarking .NET 7</h2>

<p>I got started by this video</p>

<!-- Courtesy of embedresponsively.com //-->

<div class="responsive-video-container">
    <iframe src="https://www.youtube-nocookie.com/embed/sa3XsvSiMtk" frameborder="0" webkitallowfullscreen="" mozallowfullscreen="" allowfullscreen=""></iframe>
  </div>

<h3 id="measure-command">Measure-Command</h3>

<p>Default output of Measure-Command, using git.exe as a benchmark for a real-life native application:</p>

<div class="language-plaintext highlighter-rouge"><div class="highlight"><pre class="highlight"><code>PS C:\&gt; Measure-Command { git.exe --version | Out-Default }
git version 2.35.1.windows.2


Days              : 0
Hours             : 0
Minutes           : 0
Seconds           : 0
Milliseconds      : 47
Ticks             : 476314
TotalDays         : 5.51289351851852E-07
TotalHours        : 1.32309444444444E-05
TotalMinutes      : 0.000793856666666667
TotalSeconds      : 0.0476314
TotalMilliseconds : 47.6314
</code></pre></div></div>

<p>we can limit the result to TotalMilliseconds only:</p>

<div class="language-plaintext highlighter-rouge"><div class="highlight"><pre class="highlight"><code>PS C:\&gt; ( Measure-Command { git.exe --version } ).TotalMilliseconds
47.8714
</code></pre></div></div>

<p>comparing to a full C# command line application using .NET runtime, this time Plastic SCM</p>

<div class="language-plaintext highlighter-rouge"><div class="highlight"><pre class="highlight"><code>PS C:\&gt; ( Measure-Command { cm.exe version ).TotalMilliseconds
395.9726
</code></pre></div></div>

<p>with a simple C# console app I get better results (note that in this instance the Release build doesn’t run any faster):</p>

<div class="language-plaintext highlighter-rouge"><div class="highlight"><pre class="highlight"><code>PS C:\Workspace\NETConsoleApp1&gt; (Measure-Command {.\bin\Debug\net7.0\NETConsoleApp1.exe}).TotalMilliseconds
83.2977
</code></pre></div></div>

<p>Then, publishing as a <a href="https://learn.microsoft.com/en-us/dotnet/core/deploying/native-aot/">Native application, Ahead Of Time (AOT) compilation of .NET 7.0</a>:</p>

<div class="language-plaintext highlighter-rouge"><div class="highlight"><pre class="highlight"><code>dotnet publish -r win-x64 -c Release -p:PublishAot=true
</code></pre></div></div>

<p>gives us a bigger application, but much faster to start:</p>

<div class="language-plaintext highlighter-rouge"><div class="highlight"><pre class="highlight"><code>PS C:\Workspace\NETConsoleApp1&gt; (Measure-Command {.\bin\Release\net7.0-windows7.0\win-x64\publish\NETConsoleApp1.exe}).TotalMilliseconds
24.717
</code></pre></div></div>

<h2 id="convertfrom-json">ConvertFrom-Json</h2>

<p>An equivalent to unix <code class="language-plaintext highlighter-rouge">| jq</code> Json reader/formatter in PowerShell</p>

<div class="language-plaintext highlighter-rouge"><div class="highlight"><pre class="highlight"><code>curl.exe http://localhost:18104/api/xxx -X GET -H "content-type: application/json" --header "Authorization: &lt;token&gt;" | ConvertFrom-Json
</code></pre></div></div>]]></content><author><name>Sébastien Rombauts</name></author><category term="tools" /><category term="command-line" /><category term="dotnet" /><summary type="html"><![CDATA[I figured that I should keep track of some useful command-line tools that I am learning, so I’ll write down them as blog posts and keep updating them.]]></summary></entry><entry><title type="html">DIY building an RC plane from Depron</title><link href="http://srombauts.eu/2022/11/26/diy-depron-rc-plane/" rel="alternate" type="text/html" title="DIY building an RC plane from Depron" /><published>2022-11-26T00:00:00+01:00</published><updated>2022-11-26T00:00:00+01:00</updated><id>http://srombauts.eu/2022/11/26/diy-depron-rc-plane</id><content type="html" xml:base="http://srombauts.eu/2022/11/26/diy-depron-rc-plane/"><![CDATA[<p>The idea to build my own quadcopter drone, or my own RC plane, has always been tempting. My main issue was the lack of a dedicated space to build, and more importantly, a space to fly.</p>

<p>I have not solved these, but at long last, I have started building my own plane (with the help of my kids :o)!</p>

<p>The Youtube video that got me started (in French, but see similar videos in English that also helped me) is:</p>

<!-- Courtesy of embedresponsively.com //-->

<div class="responsive-video-container">
    <iframe src="https://www.youtube-nocookie.com/embed/qNyAMTq8BZ0" frameborder="0" webkitallowfullscreen="" mozallowfullscreen="" allowfullscreen=""></iframe>
  </div>

<h2 id="cessna-172-characteristics">Cessna 172 characteristics</h2>

<h3 id="real">Real</h3>

<ul>
  <li>8.07m lenght from tip of the proppeler to the tail</li>
  <li>11.02m wingspan
    <ul>
      <li>2.54m to the break between wing flaps to ailerons</li>
    </ul>
  </li>
  <li>3.45m tail width</li>
  <li>2.72m height to the tip of the tail</li>
  <li>2.18m width between the wheels</li>
</ul>

<h3 id="model-17th">Model 1/7th</h3>

<ul>
  <li>101cm 1/8th length</li>
  <li>159cm 1/7th
    <ul>
      <li>?</li>
    </ul>
  </li>
  <li>50cm 1/7th</li>
  <li>?38cm?</li>
  <li>?</li>
</ul>

<h2 id="list-of-hardware">List of hardware</h2>

<h3 id="hardware">Hardware</h3>

<p>Some of this is optionnal, eg to make the plane looks good, some of it is tooling that can be reused for other projects.</p>

<ul>
  <li><a href="https://www.bricodepot.fr/nanterre/8-plaques-de-polystyrene-extrude-80-x-60-cm/prod53395/">Depron / Extruded Polystyrene Foam Sheets 6mm 80x60cm 8x (24.10€)</a></li>
  <li><a href="https://www.amazon.fr/gp/product/B01191KS0K">Reinforced adhesive tape 50mm (17.06€)</a></li>
  <li><a href="https://www.amazon.fr/gp/product/B08N2WXWXV">Red polypropylene adhesive tape 48mm x 66m (7.95€)</a></li>
  <li><a href="https://www.amazon.fr/gp/product/B08MV8TB2H">White polypropylene adhesive tape 48mm x 66m (7.95€)</a></li>
  <li><a href="https://www.amazon.fr/gp/product/B093H4GX4B">Steel cable 1mm x 20m (6.18€)</a></li>
  <li><a href="https://www.amazon.fr/gp/product/B09QCZVP3L">Nylon clevis keper clip x20 (15.0€)</a></li>
  <li><a href="https://www.amazon.fr/gp/product/B07CQS4PF1">Nylon hinge (6.00€)</a></li>
  <li><a href="https://www.amazon.fr/gp/product/B081V87S98">Wheels 64mm 2x (10.47€)</a></li>
  <li><a href="https://www.miniplanes.fr/baguette-de-fibre-de-carbone-30-x-05-mm-pichler-c2466">Carbone fiber plate 3.0mm x 0.5mm x 1m (1.00€)</a></li>
  <li><a href="https://www.miniplanes.fr/jonc-carbone/rond/carbon-fibre-round-tube-40mm-20mm-1mt-jp5518416-p-7483.html">Carbone fiber tube 4.0mm x 1m (6.00€)</a></li>
</ul>

<h3 id="electronics">Electronics</h3>

<ul>
  <li><a href="https://www.amazon.fr/gp/product/B07BS7DFW3">1000KV Brushless Motor A2212 13T with 30A Brushless ESC Set 1045 Propeller Accessories Kit Mount (25.49€)</a></li>
  <li><a href="https://www.amazon.fr/gp/product/B0B68N2HMV">DTXMX Flysky FS-iA6B 2.4GHz receiver (27.99€)</a></li>
  <li><a href="https://www.amazon.fr/gp/product/B07CZ42862">Micro Servo 9g x5 (14.99€)</a></li>
  <li><a href="https://www.amazon.fr/gp/product/B09MHHLKPR">Y extension cables (10.50€)</a></li>
  <li>
    <p><a href="https://www.amazon.fr/gp/product/B07PC1YKVW">XT30 connectors x2x10 (8.99€)</a></p>
  </li>
  <li><a href="https://www.amazon.fr/gp/product/B07MY3DXPB">Servo tester (5.99€)</a></li>
</ul>

<h3 id="already-owned">Already owned</h3>

<p>Hardware I had for a few years, for <a href="/2019/07/28/beta75x-3s-whoop-quadcopter/">my tiny drone</a></p>

<ul>
  <li>Jumper T12 multi-protocol Tranceiver</li>
  <li>LiPo 3S 300mAh batteries (I will ideally need to switch to +1000mAh for ~100g batteries for longer flights)</li>
</ul>

<h2 id="weight-issue">Weight issue</h2>

<p>Nearly 3 weeks in the slow process, I discoverd that the plane was weighting already close to 800g without the battery, compared to the supposed ready-to-fly 600g.</p>

<ol>
  <li>I took a step back and weighted the equivalent of all the hot glue I had used so far; something like 5x20g is added to the plane :o ! That’s bad. So people are using Cyanocrylate (brittle) or dedicated UHU POR like foam glue.</li>
  <li>Then I weighted the white adhesive tape I had used compared to a new one; some aditional 80g where added to the frame! That’s super bad :(</li>
</ol>

<p>That’s a hard lesson to learn so far in the project. Going from +600 to +800, ie adding 33% more weight is a big issue especially for a beginer trainer airplane.</p>

<p>Now, this has muliple consequences;</p>

<h3 id="wheels">Wheels</h3>

<p>Landing wheels where never robust enough, but now with all the extra weight, they are bending way to much, and I had to make them more streight, lossing some of the</p>

<h3 id="balance-issue">Balance issue</h3>

<p>Now that’s not all!
With all this added weight, the plane is quite tail heavy, and this is also bad. Impossible to fly without adding more weight to the tip; I would need to buy bigger batteries and put them at the very front.</p>

<h3 id="solutions">Solutions</h3>

<p>So now, I’ll have to make sure to remove as much of the white adhesive tape, starting with the tail. And I’ll make sure to weight all what I remove to take note of what I am saving their. After that, removing further to the fuselage can help even more with the weight, but won’t play too much with the balance of the plane. Finaly, for the wings I think that I prefer to keep them like that for extra durability, but it will depend of my results with the above weight removal.</p>

<p>In order to move more weight to the front, it could be good to cut and reglue the motor support a centimeter toward the tip, which would move something like 80g. A good win! Just quite destructive, especially since I already cut &amp; reglue it once. In fact, there is probably too much glue to it.</p>

<p>Another option to consider would be to dig into the fuselage to cut through some pieces and remove some of them, especially remove some part that are glued in order to remove the glue with it. But I fear that this would be much more invasive, destructive &amp; maje the airplane more fragile.</p>

<p>But at this stage, it might be better to just fly the plane until I crash it to hard, and build another one from scratch with all this experience aquired.</p>

<h3 id="results">Results</h3>

<p>I was able to shave off ~28g from the tail and the rear of the fuselage. From a balance perspective it’s a game changer.</p>

<h2 id="other-similar-diy-videos">Other similar DIY videos</h2>

<!-- Courtesy of embedresponsively.com //-->

<div class="responsive-video-container">
    <iframe src="https://www.youtube-nocookie.com/embed/LzZ4Oqk_J1Y" frameborder="0" webkitallowfullscreen="" mozallowfullscreen="" allowfullscreen=""></iframe>
  </div>

<!-- Courtesy of embedresponsively.com //-->

<div class="responsive-video-container">
    <iframe src="https://www.youtube-nocookie.com/embed/zecqJ_5iSmM" frameborder="0" webkitallowfullscreen="" mozallowfullscreen="" allowfullscreen=""></iframe>
  </div>

<h2 id="footnotes">Footnotes</h2>

<p>I’ll make sure to update this post with pictures of the work in progress.</p>

<p>Cheers!</p>]]></content><author><name>Sébastien Rombauts</name></author><category term="diy" /><category term="rc" /><summary type="html"><![CDATA[The idea to build my own quadcopter drone, or my own RC plane, has always been tempting. My main issue was the lack of a dedicated space to build, and more importantly, a space to fly.]]></summary></entry><entry><title type="html">I Joined Unity!</title><link href="http://srombauts.eu/2022/02/22/I-joined-unity/" rel="alternate" type="text/html" title="I Joined Unity!" /><published>2022-02-22T00:00:00+01:00</published><updated>2022-02-22T00:00:00+01:00</updated><id>http://srombauts.eu/2022/02/22/I-joined-unity</id><content type="html" xml:base="http://srombauts.eu/2022/02/22/I-joined-unity/"><![CDATA[<p>Hey, I have joined <a href="https://unity.com">Unity Technologies</a> as a Senior Software Engineer in the VCS Integrations team, part of DevOps! A significant part of my mission will be to integrate Plastic SCM into other application, starting with the <a href="/2016-04-25-unreal-engine-4-11-plastic-scm-source-control-provider">Plastic SCM plugin for Unreal Engine</a> :)</p>

<p>This thanks to <a href="https://blog.unity.com/news/codice-software-joins-unity-technologies-to-bring-version-control-to-real-time-3d-workflows">Unity Technologies acquiring Codice Software to bring Plastic SCM version control to real-time 3D workflows</a> back in August 17, 2020.</p>

<blockquote class="twitter-tweet" data-theme="light"><p lang="en" dir="ltr">Hey, I have started working at <a href="https://twitter.com/unity?ref_src=twsrc%5Etfw">@Unity</a>!<br />Part of my job will be to improve <a href="https://twitter.com/plasticscm?ref_src=twsrc%5Etfw">@PlasticSCM</a> support in <a href="https://twitter.com/UnrealEngine?ref_src=twsrc%5Etfw">@UnrealEngine</a> ;)<br />Nice, right?</p>&mdash; Sébastien Rombauts (@SRombauts) <a href="https://twitter.com/SRombauts/status/1496159161775763471?ref_src=twsrc%5Etfw">February 22, 2022</a></blockquote>
<script async="" src="https://platform.twitter.com/widgets.js" charset="utf-8"></script>]]></content><author><name>Sébastien Rombauts</name></author><category term="vcs" /><category term="unreal-engine" /><category term="unity" /><category term="community" /><summary type="html"><![CDATA[Hey, I have joined Unity Technologies as a Senior Software Engineer in the VCS Integrations team, part of DevOps! A significant part of my mission will be to integrate Plastic SCM into other application, starting with the Plastic SCM plugin for Unreal Engine :)]]></summary></entry><entry><title type="html">Beta75X 3S Tiny Whoop Quadcopter</title><link href="http://srombauts.eu/2019/07/28/beta75x-3s-whoop-quadcopter/" rel="alternate" type="text/html" title="Beta75X 3S Tiny Whoop Quadcopter" /><published>2019-07-28T00:00:00+02:00</published><updated>2019-07-28T00:00:00+02:00</updated><id>http://srombauts.eu/2019/07/28/beta75x-3s-whoop-quadcopter</id><content type="html" xml:base="http://srombauts.eu/2019/07/28/beta75x-3s-whoop-quadcopter/"><![CDATA[<p>I have always been interested in Radio Controlled cars, planes, and later in this new trend with drones! Not these drones that follow you or use GPS to film or take pictures of the ground; what I enjoy is free flight, acrobatics even! But living near Paris, there really isn’t a good option for these outdoor activities. Until… toothpick and tiny whoop mini drones are becoming a big thing!</p>

<p>I have finally ordered a <a href="https://betafpv.com/products/beta75x-whoop-quadcopter-3s">Beta75X 3S Tiny Whoop quadcopter drone from BetaFPV</a>. I won’t use if with FPV mask or goggles for now, until I know what I would like to do with it. I feel that’s the perfect format for me to start with; it’s usable by a begginer completely indoor, and then it’s also easy to try it outdoor even in very small areas. And finally, with it beeing so small, it’s also something easy to transport for a weekend or vacations, and enjoy anywhere.</p>

<!-- Courtesy of embedresponsively.com //-->

<div class="responsive-video-container">
    <iframe src="https://www.youtube-nocookie.com/embed/ms1Se7y4E_Y?start=152" frameborder="0" webkitallowfullscreen="" mozallowfullscreen="" allowfullscreen=""></iframe>
  </div>

<p>I am posting this to be able to share quickly with friends, and for me to find back all the technical details in no time.</p>

<h2 id="beta75x-3s-tiny-whoop-quadcopter">Beta75X 3S Tiny Whoop Quadcopter</h2>

<ul>
  <li>weight 45.3g</li>
  <li>1103 8000Kv brushless motors</li>
  <li>F4 2-4S AIO 12A Flight Controller (FC)</li>
  <li>Customized EOSV2 Camera, with 25/200mW VTX</li>
  <li>75mm between motors in diagnoal</li>
  <li>I choose the DSMX micro receiver</li>
</ul>

<p><img src="/assets/images/Beta75X-3S-Whoop-Quadcopter.webp" alt="BetaFPV Beta75X Whoop Quadcopter" /></p>

<h2 id="batteries-350mah-2s">Batteries 350mAh 2S</h2>

<ul>
  <li>I am actually starting with <a href="https://betafpv.com/products/350mah-2s-lipo-battery-2pcs">their 2S batteries</a> that should be easier to learn how to fly indoor
    <ul>
      <li>2S 7.4V 35C (70C peak)
        <ul>
          <li>the 8000Kv motors can thus reach ~59k RPM</li>
        </ul>
      </li>
      <li>350mAh</li>
      <li>weight 20g, dimensions 57x16x12mm</li>
      <li>XT30 connector, 20AWG wire</li>
      <li>JST-XH balance lead connector</li>
      <li>Flight time ~4 minutes</li>
    </ul>
  </li>
</ul>

<p><img src="/assets/images/BetaFPV-350mAh-2S-Battery.webp" alt="BetaFPV 350mAh 2S battery" /></p>

<h3 id="batteries-300mah-3s">Batteries 300mAh 3S</h3>

<ul>
  <li>The plan is to upgrade later to <a href="https://betafpv.com/products/300mah-3s-45c-lipo-battery-s-version-2pcs">their 3S batteries</a> to offer much increased power
    <ul>
      <li>3S 11.1V 45C
        <ul>
          <li>the 8000Kv motors can thus reach ~59k RPM</li>
        </ul>
      </li>
      <li>300mAh</li>
      <li>weight 26g</li>
    </ul>
  </li>
</ul>

<h2 id="jumper-t12-plus-radio-controller-and-transmitter">
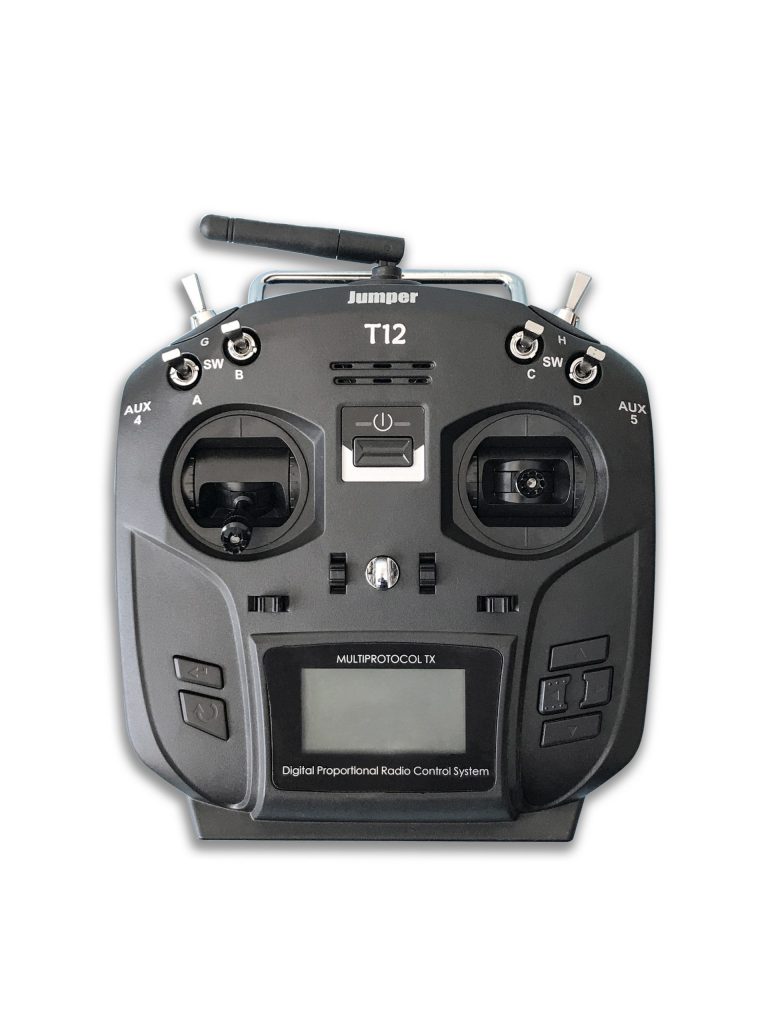
Jumper T12 Plus Radio Controller and Transmitter</h2>

<ul>
  <li><a href="https://www.jumper-rc.com/products/transmitters/t12-plus/">Jumper T12 Plus (hall) black</a></li>
  <li>2.4ghz Multi-Protocol Module, on the JR/FrSKY compatible module bay</li>
  <li>16 channels, 12 actuators:
    <ul>
      <li>4x Hall Effect Gimbals (ch1,2,3,4)</li>
      <li>2x 2-state switches</li>
      <li>4x 3-state switches</li>
      <li>2x aux wheels</li>
    </ul>
  </li>
  <li>Open TX Software</li>
  <li>1.7” LCD screen (tiny)</li>
  <li>Weight: 342g (without battery)</li>
  <li>2S lipo battery, through the JST-XH balance lead connector
    <ul>
      <li>I ordered an Azpro 2s 1000mAh 45C (5C charge)</li>
    </ul>
  </li>
  <li>Simulator mode: 3.5mm standard ppm output or USB HID</li>
</ul>

<p><img src="/assets/images/Jumper-T12-Plus-black.jpg" alt="Jumper T12 Plus (hall) black" /></p>

<h2 id="htrc-t240-duo-lipo-charger">
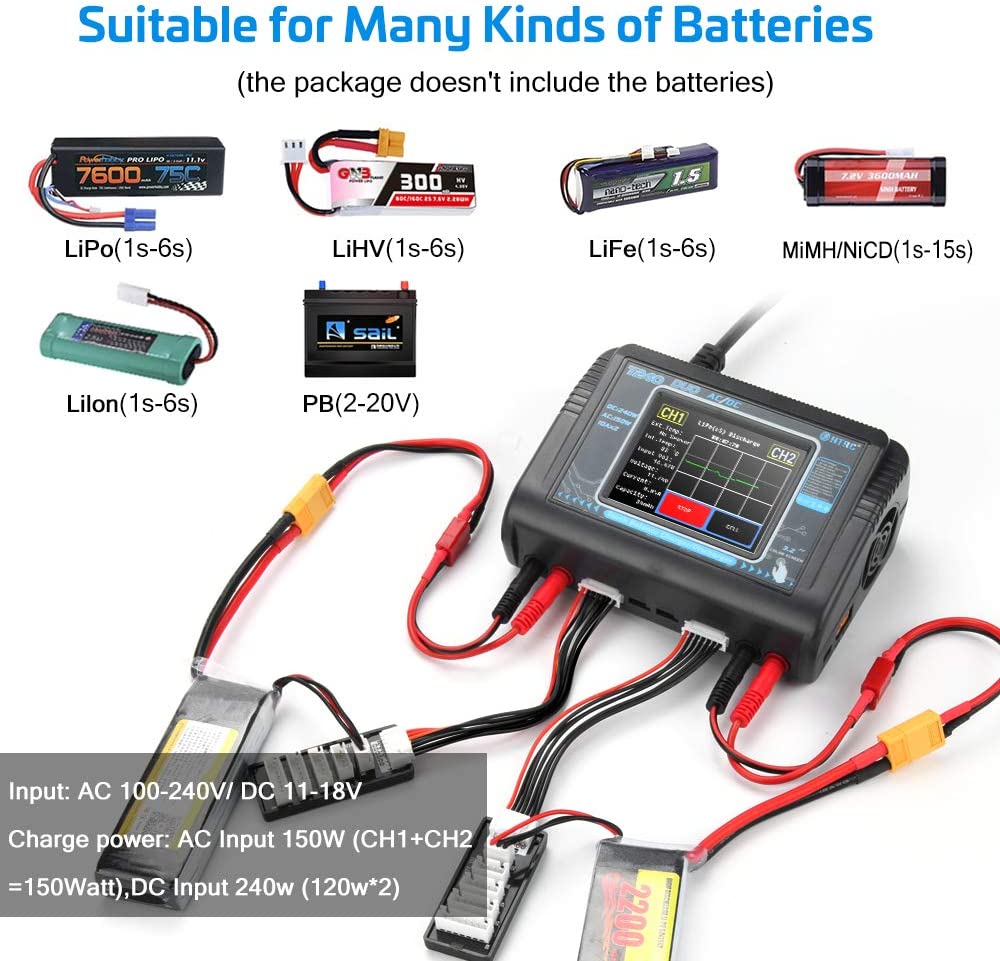
HTRC T240 Duo Lipo Charger</h2>

<ul>
  <li>Dual charger, 1S-6S LiPo batteries (but also LiFe, NiCd, NiMh etc)</li>
  <li>LCD screen, programmable charge rates with memory, battery diagnostics</li>
  <li>240V AC or 12V DC input</li>
</ul>

<p><img src="/assets/images/T240-DUO-Battery-Charger.jpg" alt="T240 Duo Lipo Charger" /></p>

<h2 id="future">Future</h2>

<p>The firmware are open-source, and also configurable and programmable, which is especially important on the flight controller, so I might dig deeper into these.</p>

<p>As for the hardware, I might consider buying a FPV screen/mask to fly arround.
It is possible that I will wait instead for HD digital solution to take over, as the analog old school TV look of it is not my favorite…</p>

<p>I might one day opt for a bigger drone, into the cinewhoop category for example.</p>

<h3 id="rc-planes">RC Planes</h3>

<p>Edit December 2022: the future is there, and I have now built not one, but two RC planes!
See <a href="/2022/11/26/diy-depron-rc-plane/">DIY Depron RC Plane</a>.</p>]]></content><author><name>Sébastien Rombauts</name></author><category term="rc" /><summary type="html"><![CDATA[I have always been interested in Radio Controlled cars, planes, and later in this new trend with drones! Not these drones that follow you or use GPS to film or take pictures of the ground; what I enjoy is free flight, acrobatics even! But living near Paris, there really isn’t a good option for these outdoor activities. Until… toothpick and tiny whoop mini drones are becoming a big thing!]]></summary></entry><entry><title type="html">I Joined Darewise Entertainment!</title><link href="http://srombauts.eu/2018/04/04/I-joined-darewise-entertainment/" rel="alternate" type="text/html" title="I Joined Darewise Entertainment!" /><published>2018-04-04T00:00:00+02:00</published><updated>2018-04-04T00:00:00+02:00</updated><id>http://srombauts.eu/2018/04/04/I-joined-darewise-entertainment</id><content type="html" xml:base="http://srombauts.eu/2018/04/04/I-joined-darewise-entertainment/"><![CDATA[<p>I joined <a href="https://www.darewise.com/">Darewise Entertainment</a> as a Senior Software Engineer in the tech team, to develop an announced game. I will be working with <a href="https://www.unrealengine.com/">Unreal Engine 4</a> and <a href="https://ims.improbable.io/products/spatialos">SpatialOS</a> multiplayer midlewear!</p>

<blockquote class="twitter-tweet"><p lang="en" dir="ltr">Today was my last day at my company, after many (many) years of good and loyal services... Next week I start at @WeDareWise as a senior programmer to work on <a href="https://twitter.com/UnrealEngine?ref_src=twsrc%5Etfw">@UnrealEngine</a> and <a href="https://twitter.com/Improbableio?ref_src=twsrc%5Etfw">@Improbableio</a>&#39;s <a href="https://twitter.com/hashtag/SpatiaOS?src=hash&amp;ref_src=twsrc%5Etfw">#SpatiaOS</a>! <a href="https://twitter.com/hashtag/ue4?src=hash&amp;ref_src=twsrc%5Etfw">#ue4</a> <a href="https://twitter.com/hashtag/dreamjob?src=hash&amp;ref_src=twsrc%5Etfw">#dreamjob</a></p>&mdash; Sébastien Rombauts (@SRombauts) <a href="https://twitter.com/SRombauts/status/979778872928595969?ref_src=twsrc%5Etfw">March 30, 2018</a></blockquote>
<script async="" src="https://platform.twitter.com/widgets.js" charset="utf-8"></script>

<p>I happen to met with their Technical Director while he was evaluating the <a href="/2016-04-25-unreal-engine-4-11-plastic-scm-source-control-provider">Plastic SCM plugin for Unreal Engine 4</a>.</p>]]></content><author><name>Sébastien Rombauts</name></author><category term="unreal-engine" /><category term="gamedev" /><summary type="html"><![CDATA[I joined Darewise Entertainment as a Senior Software Engineer in the tech team, to develop an announced game. I will be working with Unreal Engine 4 and SpatialOS multiplayer midlewear!]]></summary></entry><entry><title type="html">Unreal Engine 4: use Swarm to distribute Lighting build on Local Network</title><link href="http://srombauts.eu/2017/11/10/ue4-use-swarm-distribute-lighting-build-network/" rel="alternate" type="text/html" title="Unreal Engine 4: use Swarm to distribute Lighting build on Local Network" /><published>2017-11-10T00:00:00+01:00</published><updated>2017-11-10T00:00:00+01:00</updated><id>http://srombauts.eu/2017/11/10/ue4-use-swarm-distribute-lighting-build-network</id><content type="html" xml:base="http://srombauts.eu/2017/11/10/ue4-use-swarm-distribute-lighting-build-network/"><![CDATA[<p>This is a quick tutorial on how to install and configure Unreal Engine 4’s Swarm Agent and Coordinator to distribute Lighting build (that is, UE4’s Lightmass’s ray-tracing precomputations, running on the CPU) across a Local Network of 64 bits Windows 10 machines. There are already a few good ressources on the subject, but I had to read through a bunch of them to pick all the needed information.</p>

<p><img src="/assets/images/Unreal-Engine-Building-Lighting.gif" alt="Building lighting..." /></p>

<h2 id="existing-online-documentation">Existing online documentation</h2>

<ol>
  <li><strong>Edit:</strong> There is now a brand new <a href="https://docs.unrealengine.com/en-US/RenderingAndGraphics/Lightmass/UnrealSwarmOverview/">official documentation of  <strong>Unreal Swarm</strong></a>!</li>
  <li>UDK’s documentation <a href="https://docs.unrealengine.com/udk/Three/Swarm.html">Unreal Swarm – Massive Application Distribution for Unreal Engine 3</a> is actually quite good, though not entirely up-to-date</li>
  <li>UE4’s documentation <a href="https://docs.unrealengine.com/latest/INT/Engine/Rendering/LightingAndShadows/Lightmass/">Lightmass Global Illumination</a>
is more high level, and lacking a section on Swarm Settings</li>
  <li><a href="https://iamsparky.wordpress.com/2010/08/24/tutorial-setting-up-swarm-for-multiple-machines/">Brian Goodsell’s Tutorial: Setting Up Swarm for Multiple Machines</a> is very good but slightly out-dated, not saying how to install the Swarm tools</li>
  <li><a href="http://niberspace.com/blog/benchmark-evaluation-of-ue4-distributed-swarm-lightmass-lightmap/">Niberspace’s Is UE4 Distributed Rendering Worth It?</a> gives information on the performances you can expect of it</li>
  <li><a href="https://pkisensee.wordpress.com/2015/11/06/baking-with-swarm/">Baking with Swarm</a> gives a lot of in-details technical information (but far too much)</li>
  <li>Edit: <a href="https://nerivec.github.io/old-ue4-wiki/pages/swarm-agent-troubleshooting.html">Swarm Agent Troubleshooting (wiki)</a> seems to be the source of some of the official documention :)</li>
  <li>Edit: And now, a great Youtube tutorial:</li>
</ol>

<!-- Courtesy of embedresponsively.com //-->

<div class="responsive-video-container">
    <iframe src="https://www.youtube-nocookie.com/embed/30AtJT8yoR8" frameborder="0" webkitallowfullscreen="" mozallowfullscreen="" allowfullscreen=""></iframe>
  </div>

<h2 id="what-is-swarm">What is Swarm</h2>

<p>The Swarm <strong>Agent</strong> is the process launched in the background (daemon) when you hit “Build Lighting” on your Unreal Engine Editor. That is, it is the application that bake your  lighting in the UE Lightmass. By default it uses your computer’s CPU cores to do so.</p>

<p>The Swarm <strong>Coordinator</strong> is a sibling process that you can launch manually to distribute your Lighting build on multiple Agents across the network.</p>

<h2 id="installation-of-agentcoordinator">Installation of Agent/Coordinator</h2>

<p>Installation on a Windows 7/8/10 64 bits up-to-date is straightforward:</p>

<ol>
  <li>You need the .NET 4.0 framework, which comes by default with any recent version of Windows.</li>
  <li>You should also deactivate the power saving/standby mode on every PC, else it will disable the Swarm Agent on the sleeping machines.</li>
</ol>

<p>Note that this should also work on Linux &amp; macOS with wine.</p>

<p>To install, you can either:</p>

<ol>
  <li>Use existing installation of Unreal Engine on each computers of the network. All versions are cross-compatible so you can distribute your Lightmass work to Swarm Agents of outdated UE4 installation without any problem.</li>
  <li>Or, on computers without UE4, just copy the content of the <strong>Engine/Binaries/DotNET</strong> folder. You don’t need all this files, and no subfolders, but the whole is only a few MB in size. Put this on a fast disk with more than 10 GB free space for Agent cache.</li>
</ol>

<figure class="">
  <img src="/assets/images/Swarm-Files.png" alt="List of files in the DotNet folder" /><figcaption>
      Content of the DotNet folder.

    </figcaption></figure>

<p>You need to choose an always-on machine, like a small/old server to act as the <strong>Swarm Coordinator</strong>. If you don’t have one, you can select any other Agent machine to host the Coordinator, but you should ensure that it stays online all the time you need it! On my use-case, I’ve selected my laptop (named “ASUS-I7”) to be the Coordinator, so that I can use it when away.</p>

<p>Lastly, you should ask the system to auto-start the Swarm Agent (and/or Coordinator on the selected machine) when the user log-in. To do so, put a shortcut to the executable on the Windows Startup folder, which is located here:</p>

<div class="language-plaintext highlighter-rouge"><div class="highlight"><pre class="highlight"><code>C:\Users\x\AppData\Roaming\Microsoft\Windows\Start Menu\Programs\Startup\
</code></pre></div></div>

<h2 id="swarm-agent-settings">Swarm Agent Settings</h2>

<p>The Coordinator does not really need any settings. You need to accept the Windows Firewall request to let it communicate freely, though!</p>

<p>The Swarm Agent needs to be told how to distribute it’s work. To do that, launch the Swarm Agent if it is not already running, and double-click on it’s small icon hidden on the tray bar:</p>

<p>Go to the “Settings” tab of its UI:</p>
<figure class="">
  <img src="/assets/images/Swarm-Agent-Settings.png" alt="Swarm Agent Settings" /><figcaption>
      Swarm Agent Settings (after full configuration).

    </figcaption></figure>

<p>Here, the only important Settings are (in <strong>bold</strong> those you need to change):</p>

<ul>
  <li>AgentGroupName: Default (is fine)</li>
  <li><strong>AllowedRemoteAgentGroup: Default</strong> (to match, instead of DefaultDeployed)</li>
  <li><strong>AllowedRemoteAgentNames: *</strong> (to match everything, instead of RENDER*)</li>
  <li><strong>CoordinatorRemotingHost: ASUS-I7</strong> (name or IP of the Coordinator computer)</li>
</ul>

<p>Whenever you set the last one, the Coordinator should start to show the new Agent as soon as it connects across the network:</p>

<p><img src="/assets/images/Swarm-Coordinator-Available.png" alt="Swarm Coordinator Available" /></p>

<h2 id="usage">Usage</h2>

<p>Next time you build your lighting on any computer correctly configured, you should get your work distributed across multiple Agents, assuming that:</p>

<ol>
  <li>the Coordinator is up,</li>
  <li>other Agents are running, connected and Available (not Busy, Working, nor Dead),</li>
  <li>and your workload is big enough to distribute (enough mesh to bake lighting onto)</li>
</ol>

<p>At this stage, a look at the local Agent will tell show you the following Status:</p>
<figure class="">
  <img src="/assets/images/Swarm-Agent-Status.png" alt="Swarm Agent Settings" /><figcaption>
      Swarm Agent Status while Working.

    </figcaption></figure>

<p>A look at the Coordinator will tell you the Agent(s) involved in the work:</p>
<figure class="">
  <img src="/assets/images/Swarm-Coordinator-Status.png" alt="Swarm Agent Settings" /><figcaption>
      Swarm Coordinator with Working Agents.

    </figcaption></figure>

<p>I hope this can help, and show how all this is incredibly easy and worthy to setup!</p>]]></content><author><name>Sébastien Rombauts</name></author><category term="unreal-engine" /><category term="tutorial" /><summary type="html"><![CDATA[This is a quick tutorial on how to install and configure Unreal Engine 4’s Swarm Agent and Coordinator to distribute Lighting build (that is, UE4’s Lightmass’s ray-tracing precomputations, running on the CPU) across a Local Network of 64 bits Windows 10 machines. There are already a few good ressources on the subject, but I had to read through a bunch of them to pick all the needed information.]]></summary></entry><entry><title type="html">Unreal Engine 4.11 Plastic SCM Source Control Provider</title><link href="http://srombauts.eu/2016/04/25/unreal-engine-4-11-plastic-scm-source-control-provider/" rel="alternate" type="text/html" title="Unreal Engine 4.11 Plastic SCM Source Control Provider" /><published>2016-04-25T22:00:00+02:00</published><updated>2016-04-25T22:00:00+02:00</updated><id>http://srombauts.eu/2016/04/25/unreal-engine-4-11-plastic-scm-source-control-provider</id><content type="html" xml:base="http://srombauts.eu/2016/04/25/unreal-engine-4-11-plastic-scm-source-control-provider/"><![CDATA[<p>I have been working hard for the past month to develop a new <a href="https://github.com/SRombauts/UE4PlasticPlugin">Unreal Engine 4 Source Control plugin (Github)</a> for <a href="https://plasticscm.com/">Plastic SCM</a> (think modern Perforce with efficient and understandable GUI and very powerful branching management, with some Git interoperability).</p>

<p>I’ve been using <a href="/2014/05/10/unreal-engine-4-1-git-plugin-alpha/">my previous work (blog)</a> on the <a href="https://github.com/SRombauts/UEGitPlugin">Git Plugin for Unreal Engine 4 (Github)</a>: (<a href="/2015/02/25/unreal-engine-4-7-released-with-my-git-source-control-plugin/">now officially integrated in Engine (blog)</a>) to get the infrastructure work in a short time. Then I had to refactor a lot of it since the workflow of Plastic SCM is nothing like Git.</p>

<p>So here I am with <a href="https://github.com/SRombauts/UEPlasticPlugin/releases/tag/0.3.0-alpha">a third alpha release (Github)</a>, now already stable and useful:</p>

<ul>
  <li>status icons for assets</li>
  <li>check-out files</li>
  <li>add, rename, delete asset files</li>
  <li>check-in</li>
  <li>history log of an asset</li>
  <li>Visual Diff of Blueprints</li>
</ul>

<p><img src="https://github.com/SRombauts/UEPlasticPlugin/raw/1.0.0/Screenshots/UE4PlasticPlugin-CreateWorkspace.png" alt="CreateWorkspace" /></p>

<p>Disclaimer: I’ve done this work for Codice Software, the company behind Plastic SCM.</p>

<p>Edit: <a href="https://forums.unrealengine.com/community/community-content-tools-and-tutorials/80750-plastic-scm-source-control-provider?108688-Plastic-SCM-Source-Control-Provider">Announcement post in the Community Content section of Unreal Engine forums (UE forums)</a>. This thread has been updated with each subsequent releases of the plugin.</p>]]></content><author><name>Sébastien Rombauts</name></author><category term="unreal-engine" /><category term="vcs" /><category term="github" /><summary type="html"><![CDATA[I have been working hard for the past month to develop a new Unreal Engine 4 Source Control plugin (Github) for Plastic SCM (think modern Perforce with efficient and understandable GUI and very powerful branching management, with some Git interoperability).]]></summary></entry><entry><title type="html">Git Plugin v2.2 for Unreal Engine 4.17</title><link href="http://srombauts.eu/2016/04/25/git-plugin-v2.2-for-unreal-engine-4.17/" rel="alternate" type="text/html" title="Git Plugin v2.2 for Unreal Engine 4.17" /><published>2016-04-25T00:00:00+02:00</published><updated>2016-04-25T00:00:00+02:00</updated><id>http://srombauts.eu/2016/04/25/git-plugin-v2.2-for-unreal-engine-4.17</id><content type="html" xml:base="http://srombauts.eu/2016/04/25/git-plugin-v2.2-for-unreal-engine-4.17/"><![CDATA[<p><a href="https://github.com/SRombauts/UEGitPlugin/releases/tag/2.2-beta">I have just released a new v2.2 of the Git Source Control Provider plugin for Unreal Engine 4.17 with many bugfixes</a> backported from upcoming UE versions!</p>

<p>I am often asked if I still work on it, so I figured that I would publish some news here.</p>

<h2 id="many-pull-requests">Many Pull Requests!</h2>

<p>This is my 16th release of the Git Plugin, with 181 commits across 17 Unreal Engine version (since 4.0 in early 2014 🙂</p>

<p>I have never stopped working on the Git plugin for UE4. I have regularly submitted small or large Pull Requests to <a href="https://github.com/EpicGames/UnrealEngine">the official Unreal Engine’s Github repository (private but free)</a>.</p>

<p>To this day, <a href="https://github.com/EpicGames/UnrealEngine/pulls/SRombauts">I have provided 49 PR to Epic Games, and around 44 have already been merged</a> 🙂. The bulk of them are bugfixes on the Git plugin itself, but I’ve also added many features.</p>

<h2 id="release-v22-for-ue417">Release v2.2 for UE4.17</h2>

<ul>
  <li>Fix action icons in History log Window UI (“add”, “delete”, “branch”).
Before this, every revision of any file history was an “edit” icon!</li>
  <li>Implement GetBranchSource() so that History now displays the previous name of a file that has been renamed
Detects special case of move (“branch” in Perforce term) and point to the previous revision</li>
  <li>Fix “UpdateStatus” not picking renamed assets, nor removed/missing/untracked ones
Git rename detection require to do “git status” command on the whole sub-directory (not on the explicit list for current asset files)
Detection of deleted assets require to do an extra pass of parse in this “git status” results specifically for searching such asset files</li>
  <li>Fix global “UpdateStatus” operation not finding modified assets</li>
  <li>Run an “UpdateStatus” at “Connect” time to populate the Source Control cache
This fix a bug when right clicking on a directory of the Content Browser :
the UI does not know the state of all contained assets and as such present the “Add” entry, but clicking on it can lead to a “no asset to add” message</li>
  <li>Revert Cleanup RunDumpToFile(): WaitForProc() hang indefinitely!</li>
  <li>Expand the size of the Button “Initialize project with Git”
To help remind the user that Git Source Control is not possible without a Git repository initialized.</li>
  <li>Fix #45 Add logs to help identify problem with git.exe and git lfs</li>
  <li>Ignore “.vs” folder of Visual Studio 2017</li>
</ul>

<h2 id="future">Future</h2>

<p>Since Git LFS 2.0 was release earlier this year, I’ve been working on integrating it into the Unreal Engine plugin.</p>

<p>The problem is that it requires quite some intensive rework because it does change the whole workflow and hypothesis on how Git works (DVCS local vs centralized LFS).</p>

<p>So it will come at some point in time, but it will require more work on some smaller features, like support for “remote origin” and associated “git push”.</p>

<h2 id="support-my-work">Support my work</h2>

<p>If you want to support my work, <a href="https://www.paypal.me/SRombauts">small tips are welcome</a> 🙂</p>]]></content><author><name>Sébastien Rombauts</name></author><category term="unreal-engine" /><category term="vcs" /><category term="github" /><summary type="html"><![CDATA[I have just released a new v2.2 of the Git Source Control Provider plugin for Unreal Engine 4.17 with many bugfixes backported from upcoming UE versions!]]></summary></entry><entry><title type="html">Joining Unreal Engine 4 team for GDC 2016 in San Francisco!</title><link href="http://srombauts.eu/2016/03/02/joining-unreal-engine-4-team-for-gdc-2016-in-san-francisco/" rel="alternate" type="text/html" title="Joining Unreal Engine 4 team for GDC 2016 in San Francisco!" /><published>2016-03-02T22:33:00+01:00</published><updated>2016-03-02T22:33:00+01:00</updated><id>http://srombauts.eu/2016/03/02/joining-unreal-engine-4-team-for-gdc-2016-in-san-francisco</id><content type="html" xml:base="http://srombauts.eu/2016/03/02/joining-unreal-engine-4-team-for-gdc-2016-in-san-francisco/"><![CDATA[<p>I am so excited to announce that I am joining the Unreal Engine 4 team to attend the <a href="http://www.gdconf.com/">Game Developers Conference (GDC, Moscone Center in San Francisco, March 14-18 2016)</a> as a community member (with 9 other people of this great community)!</p>

<p>I am a senior C++ developer, with 12+ years in the industry, currently working in the transportation industry at <a href="http://www.engie-ineo.fr/systrans">ENGIE INEO Systrans</a>.</p>

<p>I embarked with Unreal Engine 4 immediately when UE 4.0 came out in early 2014, mainly for the opportunity to dive into its C++ code base! I’ve <a href="/2014/05/10/unreal-engine-4-1-git-plugin-alpha/">developed the Git Source Control Provider Plugin (blog)</a> as a free open-source <a href="https://github.com/SRombauts/UEGitPlugin">Github project</a> in my spare time.</p>

<p>I then had the opportunity to <a href="/2015/02/25/unreal-engine-4-7-released-with-my-git-source-control-plugin/">integrate it officially into the Engine in 4.7</a> a year ago (just before GDC 2015) !</p>

<p>And now, I’ve been invited to join the Epic Games teams for this mythic event, which feels like a dream to me 🙂</p>]]></content><author><name>Sébastien Rombauts</name></author><category term="unreal-engine" /><summary type="html"><![CDATA[I am so excited to announce that I am joining the Unreal Engine 4 team to attend the Game Developers Conference (GDC, Moscone Center in San Francisco, March 14-18 2016) as a community member (with 9 other people of this great community)!]]></summary></entry></feed>